Revitalizing the exterior of a home in Hamilton by painting aged vinyl siding can enhance curb appeal and protect the structure from the elements. The process involves careful preparation and the right materials to ensure a lasting finish. This article guides homeowners through the steps of assessing, cleaning, repairing, priming, choosing paint, and applying it to achieve a professional-looking result.
Key Takeaways
- Assess the paintability of vinyl siding by understanding its material limitations and consulting the manufacturer’s guidelines.
- Prepare the siding by thoroughly cleaning to remove dirt, grease, and addressing any mold or mildew issues before painting.
- Repair any damage using appropriate caulking and vinyl siding repair products, followed by applying a quality primer.
- Select the right type of paint for the Hamilton climate and ensure it complements your home’s aesthetic for the best results.
- Apply the paint meticulously, starting with the first coat and adding a second for durability, followed by proper cleanup and disposal.
Assessing Your Vinyl Siding for Paintability
Understanding Material Limitations
When preparing to paint aged vinyl siding, it’s crucial to understand the material’s limitations to ensure a successful application and lasting results. Vinyl siding is not a one-size-fits-all solution; its longevity and performance can vary based on several factors:
- Durability: Vinyl siding typically has a life expectancy of around 25 years. However, this can be extended with proper maintenance and care.
- Thickness: The thickness of the vinyl can impact its durability. Thinner siding may be more susceptible to damage over time.
- Climate: Hamilton’s climate can pose challenges to vinyl siding, with variations in temperature and humidity affecting its lifespan.
It’s essential to address signs of wear early to prevent further damage and maintain the siding’s appearance. Proper maintenance and paint selection are crucial for the longevity of vinyl siding in Hamilton.
Before painting, inspect the siding for any signs of damage or wear that could compromise the paint job. Repairing these issues beforehand will help ensure the paint adheres well and provides a protective layer against the elements.
Checking Manufacturer’s Guidelines
Before painting your vinyl siding, it’s essential to check the manufacturer’s guidelines. These guidelines provide specific instructions that can affect the warranty and performance of your siding. Here’s what to look for:
- Warranty Information: Understand what actions might void your warranty.
- Painting Recommendations: Some manufacturers may suggest specific types of paint or methods.
- Maintenance Requirements: Regular maintenance is crucial for dark colored vinyl siding in Hamilton. Inspect, clean, and choose weather-resistant paints for longevity and performance.
It’s important to adhere to these guidelines to ensure the best outcome for your painting project.
Remember, not all vinyl siding is created equal, and some may not be suitable for repainting. If the guidelines advise against painting, it’s best to consider other options for updating your home’s exterior.
Inspecting for Damage and Wear
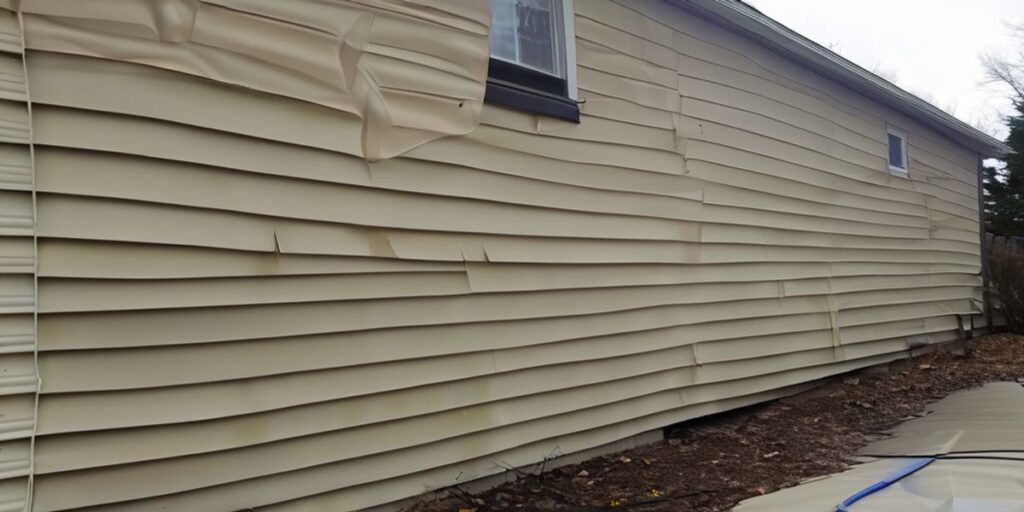
Before painting your vinyl siding, a thorough inspection is essential to ensure a lasting finish. Look for signs of damage such as cracks, holes, or warping, which can compromise the siding’s integrity. Here’s a checklist to guide you through the inspection process:
- Soft or spongy areas indicating rot or water damage
- Discoloration or peeling paint, which may signal underlying issues
- Gaps or separations between siding panels
- Warped, buckled, or visibly damaged sections
- Evidence of mold, mildew, or insect infestation
If you encounter any of these issues, it’s crucial to address them before proceeding. In some cases, repairing or replacing damaged sections may be necessary. Remember, a meticulous inspection can save you from future costly repairs and ensure a durable paint job.
While inspecting, pay special attention to areas around windows and doors, as these are common sites for wear and tear. Ensure that any damage is properly assessed and rectified.
The Cleaning Process: Preparing the Surface
Scraping Away Loose Paint
Before applying a fresh coat of paint to your vinyl siding, it’s crucial to remove any loose or peeling paint. This ensures that the new paint adheres properly and provides a smooth finish. Here’s how to effectively scrape away loose paint:
- Use a plastic putty knife or a paint scraper designed for vinyl siding to gently remove peeling paint.
- Be careful not to gouge or damage the siding material.
- For stubborn areas, a heat gun set on low can help loosen the paint, but keep it moving to avoid warping the siding.
Remember, preparation, protection, and proper tools are essential for a professional finish that lasts.
After scraping, take the time to clean the siding thoroughly. This will remove any lingering paint flakes and prepare the surface for the next steps in the painting process.
Removing Dirt, Grease, and Debris
Before applying a fresh coat of paint to your vinyl siding, it’s crucial to ensure the surface is free of dirt, grease, and debris. This step is not just about aesthetics; it’s about creating a clean canvas for the paint to adhere to, ensuring a long-lasting finish.
- Begin by gently scraping away any loose material from the siding.
- Next, use a soft-bristled brush and a mixture of mild detergent and water to wash the surface.
- For areas with stubborn grime, a solution of water and vinegar can be effective.
- Rinse the siding thoroughly with water to remove any cleaning residue.
Remember, meticulous surface preparation is key to a seamless paint job. A clean surface will not only look better but will also support the durability of the paint.
While a professional crew might use high-powered pressure washers, homeowners should proceed with caution. High-pressure water can sometimes be too harsh for aged vinyl siding, potentially causing damage. Instead, opt for a gentler approach to preserve the integrity of your siding.
Addressing Mold and Mildew Issues
When preparing aged vinyl siding for painting, it’s crucial to address any mold and mildew issues. These fungi not only pose health risks but can also undermine the integrity of your siding. Here’s a step-by-step guide to ensure a clean, safe surface for painting:
- Identify the affected areas. Look for discoloration, spots, or any signs of water damage.
- Protect yourself with safety gear, including gloves and a mask.
- Use a cleaning solution designed for mold and mildew removal. Apply it to the affected areas and let it sit as per the instructions.
- Scrub the areas gently with a soft-bristle brush to avoid damaging the siding.
- Rinse the siding thoroughly with water to remove all traces of the cleaning solution.
Remember, routine maintenance can prevent the recurrence of mold and mildew, ensuring the longevity of your siding.
If the mold issue is extensive, it may be wise to seek professional services. While DIY cleaning can be effective for minor cases, significant mold growth requires specialized treatment to ensure complete removal and prevent future problems.
Repairing and Priming Aged Vinyl Siding
Caulking Gaps and Openings
Before applying paint to aged vinyl siding, it’s crucial to ensure that all gaps and openings are properly sealed. Caulking is an essential step in preparing your siding, as it prevents moisture from penetrating and causing further damage. Here’s a simple guide to help you through the process:
- Inspect the siding for any cracks, gaps, or openings.
- Clean the areas to be caulked, removing any dirt or debris.
- Apply caulk to these areas, smoothing it out for a clean finish.
- Allow the caulk to dry completely before proceeding with priming.
Proper preparation, including caulking gaps, is essential for a successful and durable paint job on vinyl siding. Attention to detail and maintenance are key.
Remember, meticulous preparation is key for high-quality results. Preparation steps before painting vinyl siding include cleaning, priming, repairing imperfections. Proper surface preparation is crucial for a professional finish.
Applying Vinyl Siding Repair Products
When it comes to repairing aged vinyl siding, the right approach can make all the difference. Prepare thoroughly for a flawless finish by following these steps:
- Step 1: Clean the area around the damage with a dry cloth to ensure a dust-free surface.
- Step 2: Measure the size of the damage to cut the repair patch accurately.
- Step 3: Trim the repair patch to fit the damaged area.
- Step 4: Apply the patch carefully, starting from one end to avoid air bubbles.
- Step 5: Once the patch is in place, it’s ready to be painted to match the existing siding.
Remember, attention to detail is key for a durable finish. It’s not just about covering up blemishes; it’s about restoring the integrity of your siding.
For a professional outcome, use high-quality tools and take your time with each step. Consider the weather conditions in Hamilton, as they can affect the curing process of the repair products. If you’re near the Royal Botanical Gardens, for example, the higher humidity levels may require longer drying times.
Selecting and Applying a Quality Primer
Before embarking on the painting journey, it’s crucial to lay a solid foundation with a quality primer. Primer may be necessary for vinyl siding before painting, especially when you’re planning color changes or making repairs. Here’s how to ensure your primer application sets the stage for a stunning finish:
- Start by choosing a primer that’s specifically formulated for use on vinyl siding. This will ensure proper adhesion and a smooth base for the topcoat.
- Apply the primer evenly across the siding, using a brush or roller. For larger areas, a paint sprayer can be efficient, but back rolling is recommended to achieve uniform coverage.
- Allow the primer to dry completely according to the manufacturer’s instructions before proceeding with painting.
Remember, a well-applied primer can significantly enhance the paint’s durability and appearance.
While the process may seem straightforward, don’t underestimate the importance of using high-quality tools for applying the primer. A good brush, roller, or sprayer can make the difference between an uneven application and a surface that’s ready for the vibrant hues of your chosen paint.
Choosing the Right Paint and Color for Your Siding
Considering the Hamilton Climate
When preparing to paint vinyl siding in Hamilton, it’s crucial to consider the local climate’s impact on paint selection. Hamilton’s weather can be quite variable, with cold, snowy winters and warm, humid summers. This means the paint you choose must be able to withstand a wide range of temperatures and moisture levels.
- Durability: Opt for paints that are known for their longevity and resistance to fading, chipping, and peeling.
- Flexibility: Since vinyl siding expands and contracts with temperature changes, the paint must have a certain degree of elasticity.
- UV Resistance: To prevent the color from fading quickly, look for paints with good UV protection.
Remember, the right paint can not only enhance the appearance of your home but also protect it from the elements, ensuring durability over time.
While the specific brand or product is not mentioned, it’s important to select a paint that adheres well to vinyl siding and can handle the Hamilton climate. This will ensure your home’s exterior remains vibrant and well-protected for years to come.
Matching Paint to Your Home’s Aesthetic
When selecting paint for your home’s exterior, it’s crucial to consider how the color will complement the existing aesthetic. The right shade can enhance your home’s character and charm, while a mismatched color might detract from its beauty. Here are some tips to help you choose a color that aligns with your home’s style:
- Reflect on the architectural style of your home. Certain colors are traditionally associated with specific architectural designs.
- Consider the surroundings and landscape. The colors should harmonize with the natural environment.
- Take into account the visual impact of your choice on the neighborhood. A color that blends well with the surrounding homes creates a cohesive look.
While personal preference is important, it’s also essential to think about the long-term appeal of the color you select. A timeless hue can be a wise choice for maintaining or increasing property value.
Remember, the color you choose will be part of your home for years to come, so it’s worth taking the time to select a shade that you’ll be happy with in the long run. If you’re in an area like Hamilton, with its rich history and landmarks such as the Royal Botanical Gardens, you might consider colors that reflect the local heritage and natural beauty.
Understanding Paint Types and Their Benefits
When preparing to paint your aged vinyl siding, understanding the different types of paint and their benefits is crucial. Acrylic paints are often recommended for vinyl siding due to their durability and flexibility. These paints can expand and contract with the siding, reducing the likelihood of cracking and peeling.
Latex-based paints are another popular choice, known for their ease of application and quick drying time. However, it’s important to select a paint that is specifically formulated for exterior use to ensure it can withstand the Hamilton climate.
Here’s a quick guide to the benefits of different paint types:
- Acrylic: Excellent adhesion, long-lasting finish, UV resistance.
- Latex: Easy to apply, eco-friendly, and cleans up with water.
- Oil-based: Superior leveling, deep penetration, and a hard finish.
Remember, the right paint can not only transform the look of your home but also provide a protective layer that extends the life of your siding.
While the choice of color is a personal preference, lighter shades tend to reflect sunlight and may be less prone to heat-related issues. Darker colors absorb more heat, which can lead to warping of the vinyl over time. It’s essential to balance aesthetic desires with practical considerations when selecting your paint.
The Painting Process and Finishing Touches
Applying the First Coat of Paint
Once your vinyl siding is clean, repaired, and primed, it’s time to begin the transformation with the first coat of paint. This initial layer is crucial as it sets the foundation for the color and finish of your siding. Ensure even coverage by working in manageable sections and maintaining a wet edge to avoid lap marks.
- Start at the top and work your way down
- Use a paint sprayer or rollers for larger areas
- Brushes are ideal for edges and tighter spots
Remember to keep an eye on the weather; a clear day with little to no wind is ideal, especially in the Hamilton area where conditions can change rapidly. If you’re painting near iconic landmarks like the Royal Botanical Gardens, take extra care to protect the natural beauty from any paint splatters.
It’s essential to allow the first coat to dry completely before assessing if a second coat is necessary. Depending on the paint type and color, a second coat may be required for uniformity and durability.
After the first coat is applied, take a moment to clean your brushes or sprayer to prevent the paint from drying and hardening on the equipment. This will ensure a smoother application for the second coat and extend the life of your tools.
Adding a Second Coat for Durability
After the initial coat of paint has been applied and properly dried, it’s time to focus on enhancing the durability of your vinyl siding with a second coat. A second coat not only adds depth to the color but also provides additional protection against the elements, which is particularly important in areas with changing weather like Hamilton.
- Ensure the first coat is completely dry before proceeding.
- Apply the second coat in the same manner as the first, maintaining a wet edge to avoid lap marks.
- Check the weather forecast to avoid rain or extreme temperatures during drying time.
Companies often suggest removing painter’s tape between coats, but if the tape is still holding well, you can proceed with the second coat for a seamless finish. Remember, an exterior painter would recommend that the second coat is essential for achieving a uniform finish and extending the lifespan of your paint job. After the second coat, assess the need for any touch-ups, especially around trim and accents, to ensure a flawless appearance.
When considering the longevity of your paint job, it’s not just about the number of coats but also the quality of the application and the paint used. Proper maintenance, including regular cleaning and touch-ups, will help preserve the beauty and durability of your siding.
Cleaning Up and Disposing of Materials Properly
Once the final coat of paint has been applied and your vinyl siding is looking refreshed, it’s crucial to clean up and dispose of any leftover materials properly. This not only ensures a tidy workspace but also helps in maintaining the environmental integrity of Hamilton.
- Recycle old paint cans, brushes, and rollers whenever possible.
- Leftover paint should be sealed and stored for touch-ups or recycled at a local hazardous waste facility.
- For items like old magazines or newspapers used for masking, consider recycling them as well.
When dealing with hazardous materials such as muriatic acid or solvents used in the cleaning process, it’s important to follow Hamilton’s guidelines for hazardous waste disposal.
Remember to check the Waste Collection Schedule for your area to ensure you’re disposing of waste on the correct day. If you have larger items or a significant amount of waste, you may need to visit a Community Recycling Centre or the Glanbrook Landfill Site. Always avoid illegal dumping to preserve the beauty of our local landmarks, like the serene Royal Botanical Gardens.
Discover the artistry behind every stroke with our detailed guide on ‘The Painting Process and Finishing Touches’. Transform your home’s exterior with our expert techniques and witness the stunning results that have made us a trusted name in Hamilton and beyond. Ready to elevate your home’s curb appeal? Visit our website to explore our services, view before-and-after galleries, and book your free estimate today. Let us bring your vision to life with precision and care.
Conclusion
Revitalizing the vinyl siding of your Hamilton home with a fresh coat of paint can be a rewarding DIY project that not only enhances curb appeal but also extends the life of your siding. Remember, the key to a successful paint job lies in thorough preparation—cleaning, repairing, and priming the siding are essential steps. While vinyl siding isn’t traditionally paintable, with the right products and techniques, you can achieve spectacular results. Whether you’re patching up small areas or undertaking a full repaint, take the time to do it right, and you’ll be pleased with the durability and new look of your home’s exterior. Happy painting, and enjoy the transformation of your Hamilton haven!
Frequently Asked Questions
Can I paint my home’s vinyl siding?
Yes, you can paint vinyl siding, but it’s important to check with the manufacturer’s guidelines and ensure proper preparation and the right type of paint is used to adhere to the material.
What should I do to prepare my vinyl siding for painting?
Preparation includes scraping away loose paint, thoroughly cleaning off dirt, grease, and debris, repairing any damage with vinyl siding repair products, caulking gaps, and priming with a quality paint primer.
How do I select the right color when painting my siding?
Choose a color that matches your home’s aesthetic and consider the Hamilton climate for durability. It’s often helpful to bring a small piece of your existing siding to the hardware store for color matching.
Are there any long-term care considerations after painting vinyl siding?
Long-term durability can be a concern, so it’s recommended to use high-quality paints and consider products like Vinyl Renu to restore and protect your siding, potentially lasting over 10 years.
How can I address mold and mildew issues on my vinyl siding before painting?
Before painting, it’s crucial to remove any mold and mildew with appropriate cleaning solutions or treatments to ensure a clean surface that will allow the paint to adhere properly.
What are the steps involved in repairing and painting aged vinyl siding?
The steps involve cleaning and preparing the area, repairing with vinyl siding repair products, priming, painting with the chosen color, adding a second coat for durability, and proper cleanup and disposal of materials.


