Spray painting rough surfaces in Milton requires not only the right tools and materials but also a keen understanding of the techniques and challenges involved. From selecting the perfect spray paint gun to mastering the application process and ensuring a durable finish, this article will guide you through each step to achieve a smooth and even coat on any rough surface. We’ll explore the intricacies of HVLP technology, the importance of preparation, and the nuances of effective spray painting, along with troubleshooting tips and post-painting care.
Key Takeaways
- An HVLP spray gun with a gravity feed, a 2.0 MM nozzle, and a 600 CC capacity is highly recommended for achieving a smooth finish on rough surfaces.
- Proper surface cleaning, priming, and workspace setup are crucial for a successful spray painting project in Milton’s variable climate.
- Techniques such as mastering the spray pattern, adjusting pressure and flow, and timing paint application are essential for even coverage on rough surfaces.
- Common issues like paint atomization, spray width, and environmental factors like humidity and temperature can be managed with informed troubleshooting.
- For a lasting finish, apply a smooth top coat, ensure proper drying and curing times, and take protective measures against Milton’s weather conditions.
Choosing the Right Spray Paint Gun for Rough Surfaces
Understanding HVLP Technology
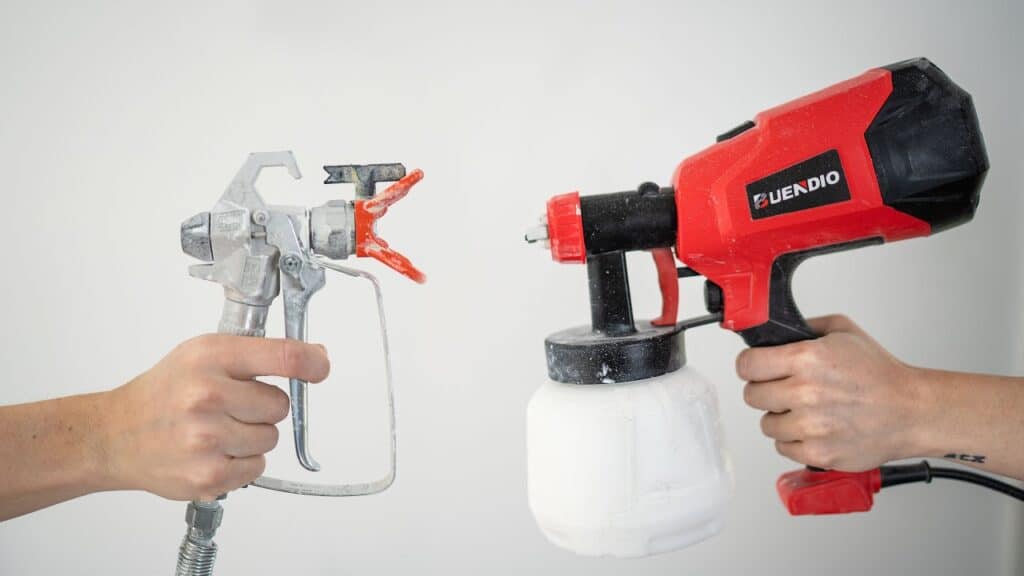
HVLP (High Volume, Low Pressure) technology is a game-changer for spray painting, especially on rough surfaces. HVLP spray guns are designed to reduce overspray and provide a finer finish by using a high volume of air at low pressure to atomize the paint. This results in a higher proportion of paint reaching the target surface, which is both cost-effective and environmentally friendly.
HVLP guns are particularly suitable for intricate or detailed work due to their precision. They are also a popular choice for their efficiency in paint usage, which can be a significant advantage when working on larger projects. Here are some key features of HVLP technology:
- Reduced overspray: Minimizes waste and environmental impact.
- Finer atomization: Achieves a smooth finish even on rough surfaces.
- Adjustable settings: Allows for control over flow rate, pressure, and spray pattern.
HVLP technology is not just about the equipment; it’s about mastering the technique to achieve the best results. Proper handling and adjustment of the HVLP gun are crucial for optimal performance.
While HVLP is a widely useful option, it’s important to note that the type of paint hopper can vary. Some may prefer a stainless steel hopper for its durability, while others might find a plastic hopper sufficient for their needs. Regardless of the material, the focus should be on the gun’s ability to deliver a consistent and quality finish.
Comparing Nozzle Sizes for Optimal Coverage
When tackling the task of spray painting rough surfaces, the choice of nozzle size is crucial for achieving optimal coverage. Nozzle sizes vary and directly affect the width and density of the paint spray. Here’s a quick guide to help you understand the impact of different nozzle sizes:
- 1.0mm nozzle: Ideal for thin, delicate materials. Provides fine atomization and precision.
- 1.5mm nozzle: A versatile option suitable for a variety of paints and finishes.
- 1.7mm nozzle: Better for thicker paints, offering good coverage without heavy buildup.
- 2.0mm nozzle: Recommended for heavy-bodied paints; it can handle substantial materials but may require more passes for even coverage.
Adjusting the nozzle size according to the paint’s viscosity and the surface’s texture is essential for a smooth finish.
Remember, the larger the nozzle, the more material it will dispense, which can be both a benefit and a drawback. Larger nozzles can cover more area quickly but may also result in excessive paint build-up if not handled correctly. Conversely, smaller nozzles provide more control and finer atomization, which is beneficial for detailed work but can be time-consuming on larger surfaces.
Assessing the Capacity and Material of Paint Cups
When selecting a spray paint gun, the capacity and material of the paint cup are crucial factors to consider. Capacity determines how much paint you can hold at a time, affecting the frequency of refills during a project. For larger projects, a higher capacity cup minimizes interruptions. Conversely, a smaller cup is lighter and may be more suitable for quick or detailed work.
The material of the paint cup also impacts performance and maintenance. Stainless steel cups are durable and easy to clean, but may be heavier. Plastic cups are lighter and may not stick to certain types of paint, making cleanup easier. However, they can be less durable and prone to issues if not handled properly. For instance, a tight plastic lid might cause the cup to deform when forced closed, especially if the cup material is thin aluminum.
- Stainless Steel: Durable, easy to clean, heavier
- Plastic: Lighter, easy cleanup, less durable
It’s important to choose a material that will not react negatively with the type of paint you’re using. For waterborne paints, avoid materials that rust easily after exposure to water.
In Milton, where the weather can vary, consider the local humidity and temperature when choosing your paint cup material, as these factors can affect the paint’s behavior and the overall results of your spray painting project.
Preparation Steps for Spray Painting Rough Surfaces
Surface Cleaning and Priming
Before applying spray paint to rough surfaces, it’s crucial to ensure that the surface is spotlessly clean. Any dirt, dust, or oils can prevent the paint from adhering properly, leading to a subpar finish. Here’s a simple guide to prepare your surface for painting:
- Clean the surface: Use a cleaner designed for your specific surface type to remove all contaminants. For tougher spots, consider using a degreaser or a specialized cleaning agent.
- Sand if necessary: If the surface is too smooth, lightly sand it with fine-grit sandpaper to create a texture that the paint can grip.
- Apply primer: Choose a self-etching primer for better adhesion. Make sure the primer is compatible with the type of paint you’ll be using.
Priming is not just about preparing the surface; it also helps in achieving a uniform color and increases the durability of the paint job. After priming, allow the surface to dry completely before proceeding to paint.
Selecting the Appropriate Paint and Primer
When embarking on a spray painting project, the selection of paint and primer is crucial for achieving a professional finish, especially for an exterior painter. The right primer ensures adhesion, color vibrancy, and longevity, laying the foundation for a successful paint job. Here are some key considerations:
- Type of Surface: Different surfaces require specific types of primer for optimal adhesion. For rough surfaces, a high-quality bonding primer is recommended.
- Paint Compatibility: Ensure the primer is compatible with the type of paint you plan to use. This prevents issues such as cracking or peeling.
- Environmental Factors: Milton’s varying weather conditions necessitate a primer that can withstand humidity and temperature fluctuations.
For aluminum siding painting, a self-etching primer is often advised to promote better adhesion and prevent paint from pooling and running.
Lastly, while selecting paints, consider factors such as the finish and durability. A paint that excels in these areas will complement the primer’s role in enhancing the overall quality of the project.
Setting Up Your Workspace for Spray Painting
When preparing to spray paint, especially on rough surfaces, setting up an optimal workspace is crucial. Ensure your area is well-ventilated to avoid the inhalation of fumes and to aid in the drying process. A space with controlled humidity and temperature is ideal, as extreme conditions can affect the paint’s behavior and finish.
- Clear the area of any dust and debris to prevent contamination of the paint surface.
- Arrange for adequate lighting to spot any inconsistencies in paint application.
- Set up a stable platform or table to hold the item being painted.
- Keep all necessary tools and materials within easy reach to streamline the painting process.
It’s essential to test your spray paint gun and technique on a scrap piece before beginning your project to ensure smooth application and to familiarize yourself with the equipment’s operation.
Remember to protect surrounding areas with drop cloths or plastic sheeting to prevent overspray. If you’re painting a larger item, like a 4’x4′ wood panel, plan for the additional time it may take to cover the surface evenly and for the subsequent cleanup of your spray paint gun.
Techniques for Effective Spray Painting
Mastering the Spray Pattern and Control
Achieving a consistent and even spray pattern is crucial when working on rough surfaces. Here are some tips to master the control of your spray paint gun:
- Start with the right equipment. Ensure your spray gun is suitable for the type of paint and the surface you’re working on.
- Adjust the spray pattern. Depending on the job, you may need a circular or oval pattern. Experiment with the adjustments to find what works best.
- Control the pressure. While the air pressure knob may seem insignificant, it’s essential to find the right balance. Too low pressure can lead to an uneven spray pattern, while too high can cause excessive overspray.
When painting outdoors in Milton, consider the local climate. Humidity and temperature can affect the paint’s behavior, so aim for conditions with less than 65% humidity and temperatures between 55-60F.
Remember to test your settings on a separate piece before starting on your main project. This will help you fine-tune the spray gun’s settings for optimal coverage and control.
Adjusting Pressure and Flow for Even Application
Achieving an even application when spray painting rough surfaces requires careful adjustment of both pressure and flow. The goal is to attain a fine, even mist that adheres well to the surface without causing runs or sags. Here are some steps to follow:
- Start by setting your air compressor to the recommended PSI for your spray paint gun, typically around 30 PSI when air is flowing through the gun.
- Adjust the flow rate to match the viscosity of the paint you’re using. Thinner paints may require a lower flow rate to prevent over-spraying.
- Test your settings on a piece of scrap material similar to your project surface. This helps ensure that the spray pattern is consistent and the paint atomization is optimal.
It’s essential to find the right balance between pressure and flow for the specific paint and surface you’re working with. Too much pressure can lead to overspray and wasted paint, while too little may result in poor coverage.
Remember to adjust the spray pattern as needed. For rough surfaces, a slightly wider pattern may provide better coverage. However, for interior painting, a narrower pattern might be more appropriate to control the flow of paint and minimize mess.
Layering and Drying: Timing Your Paint Application
Effective layering is crucial for achieving a smooth finish on rough surfaces. Here are some tips to ensure proper timing and application:
- Apply each layer thinly to avoid drips and uneven texture. Allow sufficient drying time between layers to prevent tackiness.
- Rotate the direction of your spray with each new layer to ensure even coverage across the surface.
- Monitor the drying times carefully; environmental factors like humidity can affect the drying process.
When layering paint, it’s essential to be patient and methodical. Rushing the process can lead to a subpar finish that may require additional work to correct.
Remember to use varnishes judiciously. They should be applied in thin, even layers, and each layer must dry completely before adding the next. This will help in creating a durable and aesthetically pleasing finish.
Troubleshooting Common Spray Painting Issues
Dealing with Paint Atomization and Spray Width
Proper paint atomization and achieving the desired spray width are crucial for a smooth finish, especially on rough surfaces. Here are some tips to help you manage these aspects effectively:
- Ensure your spray gun is clean and well-maintained to prevent any obstruction that could affect atomization.
- Adjust the air pressure according to the manufacturer’s recommendations to achieve optimal atomization.
- Experiment with the distance between the gun and the surface; a general rule is to keep it between 6 to 8 inches.
- Use the control knob to switch between a circular or oval spray pattern to suit the job at hand.
While a 2.0 mm nozzle may be sufficient for most tasks, consider a smaller size like a 1.0 mm tip for materials that require finer atomization, such as Cerakote.
Remember, the key to mastering spray painting is patience and practice. By fine-tuning these variables, you can ensure a consistent and even application across all types of rough surfaces.
Overcoming Humidity and Temperature Challenges
When spray painting, especially in areas like Milton where weather can be unpredictable, managing humidity and temperature is crucial for a flawless finish. High humidity levels can cause paint to take longer to dry, and may even result in a blotchy or inconsistent texture. Conversely, low humidity might lead to overly rapid drying, which can cause cracking or peeling.
Temperature also plays a significant role in paint application. Extreme heat can cause the paint to dry too quickly, while cold temperatures can prevent proper drying and curing. Here are some tips to help you manage these environmental factors:
- Monitor the weather forecast and plan your painting projects on days with favorable conditions.
- Use a dehumidifier or air conditioner to control the indoor climate if you’re painting indoors.
- Ensure good ventilation to help regulate temperature and humidity levels.
Maintaining a consistent room temperature and a low humidity level is key to achieving the best results in your spray painting endeavors.
It’s also important to consider the specific needs of the paint and primer you’re using, as some may require certain conditions to adhere and cure correctly. Always refer to the manufacturer’s guidelines for the best outcomes.
Maintaining Your Spray Paint Gun for Longevity
Proper maintenance of your spray paint gun is crucial for ensuring its longevity and performance. Regular cleaning is essential to prevent clogging and the accumulation of paint residues. Here are some steps to keep your spray gun in top condition:
- Disassemble your spray gun after each use and clean all parts thoroughly.
- Use a solvent cleaner for washing components to avoid issues like rusting after cleaning with water, especially for waterborne paints.
- Inspect and replace any worn or damaged parts, such as seals or the paint cup lid, to maintain a proper seal and prevent leaks.
It’s important to note that some parts of the spray gun, like the paint strainer, may not be reusable after cleaning. Ensure you have replacements on hand to avoid interruptions in your work.
By following these maintenance tips, you can extend the life of your spray paint gun and enjoy consistent, high-quality results in your painting projects.
Finishing Touches and Post-Painting Care
Applying a Smooth and Durable Top Coat
Achieving a smooth and durable top coat is essential for the longevity and aesthetics of your spray-painted surface. Here are some key steps to ensure a superior finish:
- Ensure each paint layer is completely dry before applying the next. This prevents any mixing or smudging that could compromise the smoothness of the final coat.
- Apply the top coat in thin layers, allowing each to dry fully. Thin layers are self-leveling and reduce the risk of drips or uneven application.
- Change the direction of your spray with each new layer to cover the entire surface evenly.
When applying a top coat, patience is crucial. Rushing the process can lead to a finish that is less than ideal, with potential stickiness or unevenness.
For those in Milton, incorporating a top coat application into your project can be as refreshing as a stroll through the serene Mill Pond Park. Just as the park’s natural beauty is preserved through careful maintenance, your spray-painted surface will maintain its allure with a properly applied top coat.
Ensuring Proper Drying and Curing Times
After applying spray paint, the drying and curing phase is critical for achieving a durable and high-quality finish. Proper drying and curing times are essential to ensure the paint adheres well and withstands the test of time. Here are some key points to consider:
- Temperature and Humidity: The environment plays a significant role in the drying process. Aim for a temperature between 65-85 degrees Fahrenheit and a humidity level below 50% for optimal conditions.
- Layering: Apply paint in thin, even layers, allowing each layer to dry completely before adding the next. This prevents drips and ensures a smooth finish.
- Curing Time: Allow the paint to cure for the time recommended by the manufacturer. This can range from 24 hours to several days, depending on the paint type and environmental conditions.
While waiting for the paint to cure, keep the painted object in a well-ventilated, dust-free area to avoid imperfections.
In the context of Milton, the fluctuating weather can impact drying times, so always check local forecasts and adjust your painting schedule accordingly. By following these guidelines, you’ll achieve a finish that not only looks professional but also lasts longer.
Protective Measures for a Lasting Finish
After applying the final coat of paint, it’s crucial to take steps to protect the surface and ensure the longevity of your work. Proper sealing and protection can significantly extend the life of your paint job, especially on rough surfaces where wear and tear are more pronounced.
- Use a high-quality sealant or varnish to provide an extra layer of protection against the elements.
- Apply the sealant in thin, even layers to avoid drips and ensure a smooth finish.
- Allow each layer to dry completely before applying the next, which can take up to an hour for some products.
It’s essential to apply these protective measures in a well-ventilated area or outdoors, especially when using products that emit strong fumes. Always follow the manufacturer’s instructions for the best results.
For those in Milton, taking a day to work on your project at the serene Kelso Conservation Area can provide the perfect low-humidity environment needed for these applications. Remember, the goal is to achieve a finish that not only looks great but can also stand up to the test of time and use.
Your home deserves the best, and our ‘Finishing Touches and Post-Painting Care’ services ensure that your freshly painted walls remain pristine and vibrant for years to come. Protect your investment with our expert advice on maintaining the beauty of your paint job. Don’t let the elements dull your home’s shine; visit our website for more information and to schedule a consultation with our painting professionals. Let us help you keep your home looking its absolute best!
Conclusion
Spray painting rough surfaces in Milton can be a rewarding DIY project with the right tools and techniques. The NEIKO 31216A Air Spray Paint Gun, with its HVLP technology and gravity feed, has proven to be a popular choice among local enthusiasts for its smooth and even paint application. While some users have experienced challenges with the aluminum cup and plastic lid, overall, the product has received positive reviews for its performance on various projects. Remember to always read the label directions carefully, test your spray first, and work in a well-ventilated area. With patience and practice, you can achieve professional-looking results on even the toughest surfaces. Happy painting!
Frequently Asked Questions
What type of spray gun is best for rough surfaces?
A HVLP (High Volume Low Pressure) spray gun with a gravity feed is suitable for rough surfaces. It provides a smooth and even paint application with good control.
How can I ensure even coverage when spray painting?
To ensure even coverage, select the appropriate nozzle size, adjust the pressure and flow settings, and use consistent spray patterns and control. Practice spraying on a test piece first.
What are some tips for preparing a rough surface for painting?
Clean the surface thoroughly and apply a suitable primer. Make sure the area is well-ventilated and set up your workspace to prevent overspray and contamination.
How do I deal with humidity and temperature when spray painting?
Spray paint in a clean, well-ventilated area with a humidity level below 65% and a temperature between 55-60F. Check the paint’s instructions for optimal conditions.
What should I do if my spray gun is not spraying evenly?
Adjust the pressure, air flow, and paint flow settings. If the problem persists, check for clogs or damage to the nozzle and ensure the paint is properly thinned.
How long should I wait between applying paint layers and varnish?
Allow each paint layer to dry completely, which could take at least half an hour, before applying the next. Wait for the paint to fully cure, which may take up to 6 months, before applying a spray varnish for protection.

